The other day I rocked up to Axes & Ales to play a game of Skullcore with my mate Ross. I'd only played the game one evening before and I was looking forward to trying the game out again and keen to demonstrate how it works to my mates.
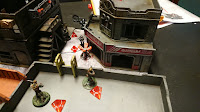
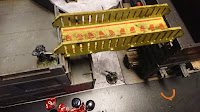
Skullcore is played on a 2x2' board - about the smallest board used when it comes to wargaming. With one of the awesome Axes & Ales club terrain boxes, I was able to create a great board for us to play on.
 |
I approached from the South and Ross from the West.
The game was suitably lubricated with Thornbury Bowls Club beers. |
I was a little worried that we'd not have enough broken ground to provide cover the units with cover, however, that didn't prove to be a problem once the game got underway. That's a good thing too: it can be hard to find the right terrain pieces for a game and something like a building is a lot easier to make work than, for example, a pile of bricks or trashbags.
The game begins with one player choosing a table edge and 'inserting' up to two models onto the board. The opposing player then chooses their table edge - which can be perpendicular to the first player's - and performs their insertion. The game then alternates between each player, working their way through the Operational then Execution Phases - I described the Operational Timeline in my last Post.
Ross and I were playing a very vanilla game - both using 5 operatives each, with Light Protection armour and Light Lethality weapons. I started and entered via an alleyway to secure the nearest objective (one of three, placed diagonally across the board). Ross approached via a perpendicular edge to the left of my table edge, taking to the rooftops.
The game quickly saw us attempting to out-position each other. I decided to deploy 2 of my units to the far right of my edge, in an attempt to skirt around what was quickly becoming a serious firefight, and secure the middle and furthest objectives.
 |
Two of Ross's guys targeting my
guys in the alley |
 |
Ross inserted a third guy above my guys
- action was heating up quickly. |
The weight of Ross's fire was causing me a lot of complications - while I was able to make it to the objective, I found myself using up all my Flow Juking and Dipping just to survive.
Flow is the action currency in the game: most actions (Measures) cost 1 Flow and all Models regenerate 2 Flow at the commencement of each new Maneuver (being the combined Operational and Execution Phases). When a Unit survives being hit by a shot, they need to expend 1 Flow to 'Dip' out of the way. Alternately, a Unit can elect to 'Juke' before the shot is resolved - doing so makes the shot harder to land and, if it does hit, it can still be Dipped later. The trouble with using Flow defensively is that it really limits the Model's offensive options.
With all the Fire that Ross was laying down, my two Models in the alley were progressively pushed back and away from the objective - fortunately, a well timed Execution attempt by me gave me the opportunity to take my first Objective. I was finding it really hard to make a breakthrough, so I tried to push my remaining Models around from the Southeast, in an attempt to flank Ross and secure the Objective in the Northeastern Objective.
As both of those Models were able to remain Contacts, they benefited from
Commands - I tried a
Leanout Measure and was able to also get some bonus Combat Moves. Leanout is a really clever mechanism, allowing a Unit to peek around a corner and fire, if the opportunity presents itself. It proved useful as I was able to take out one of Ross's Models at the far end of the fire lane running East-to-West (where Ross is pointing in the above picture).
Commands are available to Models who haven't yet been confirmed as Hostiles. While they cost Flow to perform, they can really interrupt a player's plans. E.g., Leanout can be used to get some crucial distance and provide an opportunity to lay down some reactive/opportunistic fire.
However, it was all a little too late. My guys in the alley tried their best to find some cover with one of them entering the building in the South-Western corner. Then, given I had some reasonable cover, I tried taking out Ross's remaining Units on the rooftops and street. While I did manage to take one out, the weight of fire was just too much - I quickly ran out of Flow, meaning I was even more susceptible to being injured.
I did manage to secure the Northeastern objective but was running out of manpower. I was forced to make a break for the middle Objective as Ross was well on the way to seizing both two Objectives on his next turn. Once again, the game's mechanics made it very tough for one guy two take on two - you simply just don't have enough flow to both attack and defend effectively. Ross quickly drove me back from the middle Objective and to my death and doom.
It made for a great little game. We made a few mistakes in the rules' application but nothing that detracted from our enjoyment. The firefight in the alleyway was particularly exciting and tense. I really enjoyed the game and it was able to deliver the right balance of fast-play and tension to make for a great gaming session.


